Air Muscle Octopod
Aaron Trask
Mariusz Zaczek
Advanced Digital Systems Laboratory
Fall 1998
1.0 Introduction
The air muscle octopod is an eight-legged autonomous robot using the McKibben air muscle to control leg movement. Two pairs of muscles per leg will control vertical and lateral movement. This will provide the necessary agility for the robot to walk.
2.0 The McKibben Muscle
The McKibben muscle is an artificial muscle, which is a pneumatic actuator. As the bladder inside a braided shell is filled with air, the muscle ends contract and cause a force along the muscle body. The muscles we constructed for this project were approximately 16 cm in length and were able to contract about 1 to 2 cm. In order to make one of these muscles the following items are required:
A simple piece of elastic tubing was used as the inner bladder. The tube we used was a Manosil Silicone Rubber tubing with an inner diameter of 5/32" and a wall thickness of 1/32". We obtained this material from:
Barnant Co.
28W092
Commercial Avenue
Barrington, IL 60010
1-800-637-3739 (catalog No. 75-300-350) (5/32" x 1/32" x 50')
The outer braided shell is an expandable braided polyester sleeving with a 1/2" diameter. The material can be obtained from:
Alpha Wire Corporation
711 Lidgerwood Avenue
P.O. Box 711
Elizabeth, NJ 07207
1-800-52-ALPHA
(call for a local distributor – Champaign area distributor is ALLIED)
In addition, the completed muscle requires the inner bladder to be capped at one end. For this purpose we used a 1/4" diameter ABS rod. The open end was fitted with a hose barb coupling which enabled us to connect the muscles to the tubing, which connected with the valves. The two ends of the muscles are to be crimped down using either tightly wound wire or hose clamps. We chose hose clamps, which we purchased from Small Parts Incorporated.
The muscles is assembled as follows:
1) First cut a piece of inner bladder about 14cm long.
2) Next, cut a piece of sleeving about 16cm long.
3) Cap the end of the inner bladder with a piece of ABS rod.
4) Place the hose barb coupling at the other end of the inner bladder.
5) Place this entire structure into the sleeving.
6) Securely clamp the ends of the muscle, making sure to position the hose clamps over the ABS and the coupling.
Note: It may be wise to use some sort of sealant, such as epoxy, to seal any possible leak areas and to make the connections stronger.
3.0 Leg Design
The leg design was a key point of the octopod. With the limited motion of an air muscle, the leg required optimal placement of the muscle such that maximum motion is achieved. This also reduces the amount of force applicable to lift the octopod for each step. A trade off must be made in order to insure the ability to lift the weight as well as take a reasonable sized step.
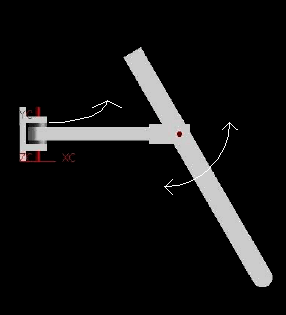
The first leg design consisted of a two joint leg as shown in Figure 3-1. It proved to be difficult to machine as well as a problem for optimal muscle placement. The cost was also a factor, as the leg required multiple thruster and radial bearings.
Figure 3-1: First Leg Design
The second leg design consisted of another two joint leg as shown in Figure 3-2. It also would be difficult to machine as well as optimally place the muscles so it was never built.

Figure 3-2: Second Leg Design
The third leg design consisted of a spherical joint leg as shown in Figure 3-3. The ball and socket joint used was found in off the shelf components which reduced cost and machining time. It has limited movement however muscle placement is easily resolved.
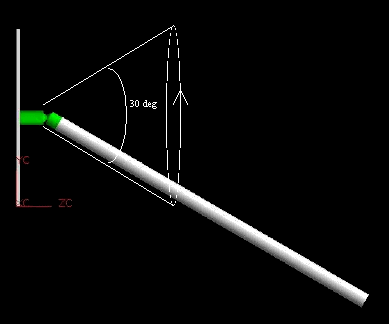
Figure 3-3: Third Leg Design
The final leg design consisted of two joints close together as shown in Figure 3-4. The joint used Delrin rod as a pivot so that bearings were not required. The leg was made out of 1/2" aluminum square bar and everything was prevented from sliding with hitch pins. This allowed adequate movement and when tested with all muscles, it performed the required step movements with ease.
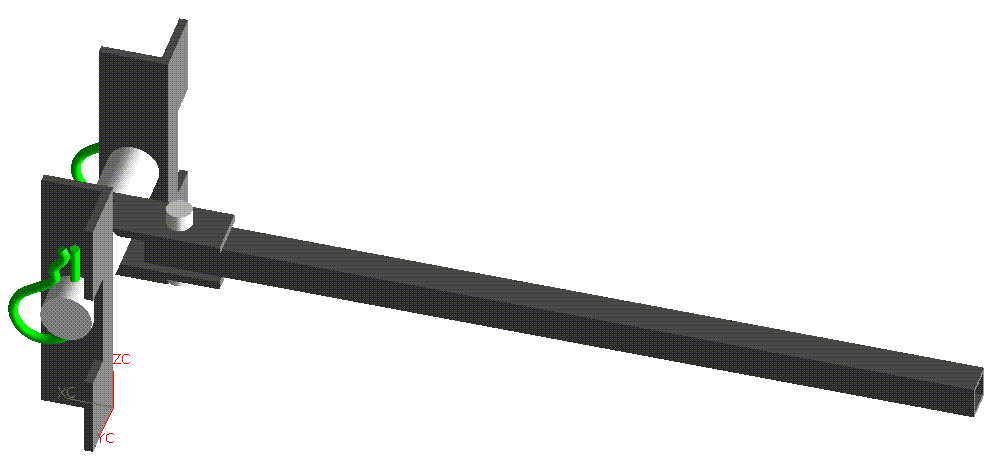
Figure 3-4: Fourth Leg Design
4.0 Body Design
The body structure of the octopod needs to be light weight. Aluminum was chosen because of its ease in machining and its light weight. The basic structure of the body uses a trapezoidal box design with aluminum (1x1x1/8 in) angle as the main component. For stability of the octopod during a step, the majority of the mass was placed in the center of the body. All of the valves and the manifold were placed as close to the center of the structure as possible. The design is show in Figure 4-1.
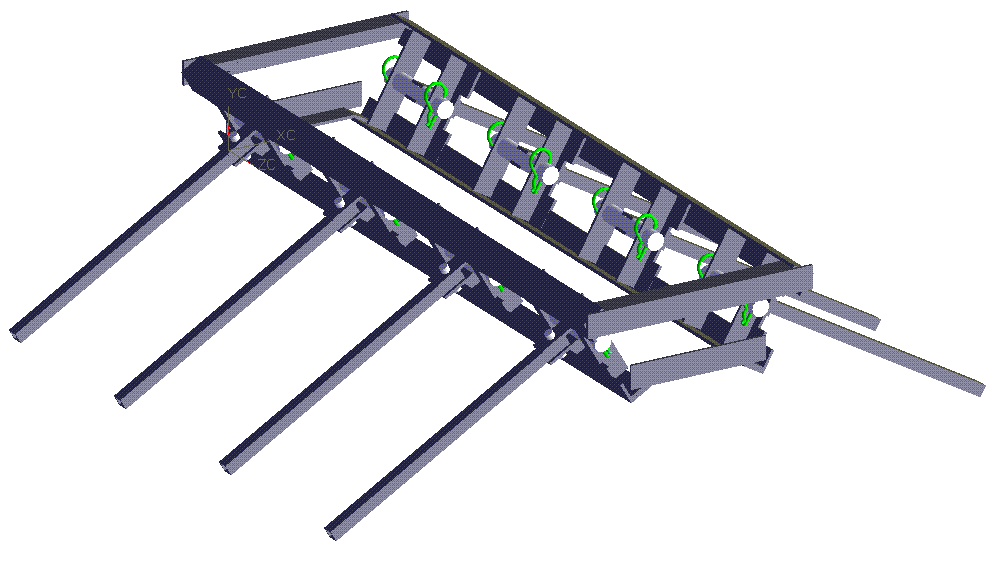
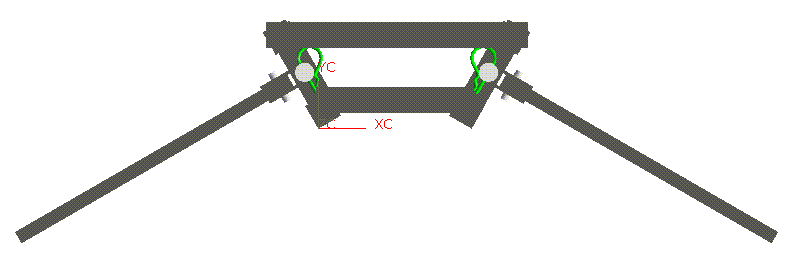
Figure 4-1: Body Structure Design
5.0 Mechanics
The octopod uses an opposing leg movement. Four of the eight legs move at a time with coupled movement. This reduces the number of valves need to control the muscles’ states as well as the complexity of the control algorithm. The movements necessary to take a step are show in Figure 5.1.
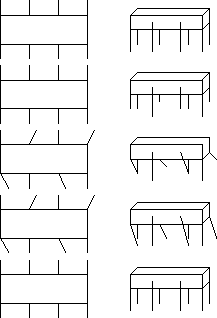
Figure 5-1: Taking a Step
6.0 Valve Configuration
The muscles of the octopod are activated using air pressure (~ 40 to 70 psi) that is controlled using a series of valves. The valves used are Clippard Minimatic 2-way and 3-way valves. The 2-way valves [EC-2M-6]) are normally closed and upon activation fill the particular muscles with air. The 3-way valves [ECO-3M-6] are normally open and allow for the air to pass right through to the muscle. When the 3-way valve is actuated the exhaust port is open while the previously open passage is closed. This results in exhausting of the air trapped by the muscle and thus relaxing the muscle back to its original configuration.
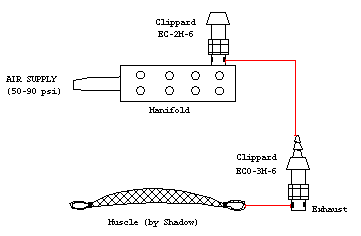
Figure 6-1. Single Muscle Control Via 2-Way and 3-Way Valves
Since there are only two distinct sets of four legs, and each set has four distinct muscles (since the muscles of a particular set are coupled) there are only eight total muscles that, in theory, must be controlled. As a result, there are eight fill valves (2-way) and eight exhaust valves (3-way) used to control the motion of the legs. The figure below shows a top view of the octopod and the relationship between the valves and legs. In this figure we see the eight 2-way valves attached directly to the manifold. These 2-way valves allow the initial burst of air to pass. The 3-way valves are connected in series with the 2-way valves and are represented in the figure below by a schematic valve symbol. As mentioned before, the 3-way valves are normally open, therefore the air passes right through them and enters the muscles directly. When the muscles are filled to satisfaction, the fill valves (2-way) are then closed and the muscle remains in a filled position until the exhaust (3-way) valves are actuated which exhaust the trapped air into the atmosphere.

Figure 6-2: Top View of Octopod Showing a Schematic of Valve Connections
As mentioned before, each of the eight legs of the octopod is connected to four muscles, which control the vertical and horizontal motion of the leg. The basic algorithm for a particular leg is as follows: top muscle is filled while muscle bottom is evacuated, this causes a pulling force on the top of the leg thus lifting it off the ground. Next, the front muscle is filled while the rear muscle is evacuated. The result is a forward movement of the leg. For the lowering of the leg, the bottom muscle is filled while the top muscle is evacuated. Finally, while the leg is resting on the ground the entire structure is pulled forward by filling the rear muscle and evacuating front muscle.
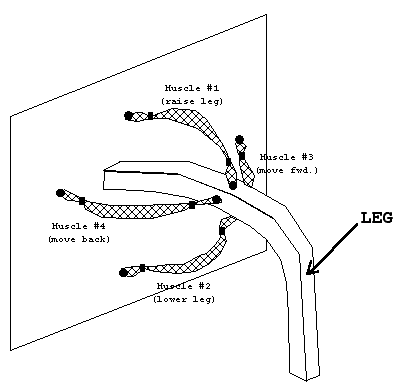
Figure 6-3: Single Leg Muscle Positioning
7.0 Circuit Design and Programming
In order to control the robot, the Motorola 68332 Business Card Computer was used to implement the above algorithm. This micro-controller is programmed using assembly language. (Code for control of a single leg is attached in the appendix of this report.)
In order to actuate a valve, the signal outputted from a pin on the micro-controller is used to switch on a FET to send power to the valve. The basic circuit for a single FET is shown in Figure 7-1 below. The MTP4N40E TMOS E-FET High Energy Power FET was used, but a lower amperage FET can also be used. The one used now allows for 4 A and 400 V while we will be operating in the 2 A and 5 V range. The basic idea behind this circuit is that when a logic high (+5 V) is sent from the micro-controller to the FET it turns it on allowing a connection to ground from the +6 V source. This in turn will light a LED (for display purposes only) and simultaneously turn on the corresponding valve.
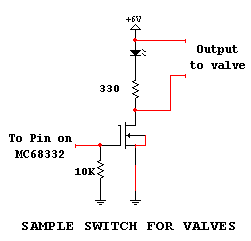
Figure 7-1: FET Schematic
Because the logic states of the two ports being used as output, ports E and F, have certain default functions there is a need to select the alternate function. This can be done by pulling down the corresponding mode select pins for port E (DATA8) and port F (DATA9) at reset time. This is done by using a MC74HCT244AN octal 3-input non-inverting buffer. This circuit is show below in Figure 7-2. In order to complete the circuit a 3 input NAND gate and inverted are required – the MC74HC10N, triple 3 input NAND gate, was used for this purpose. The coupling of 3 inputs of one of the NAND gates made this gate an inverter and helped conserve on the number of chips necessary.
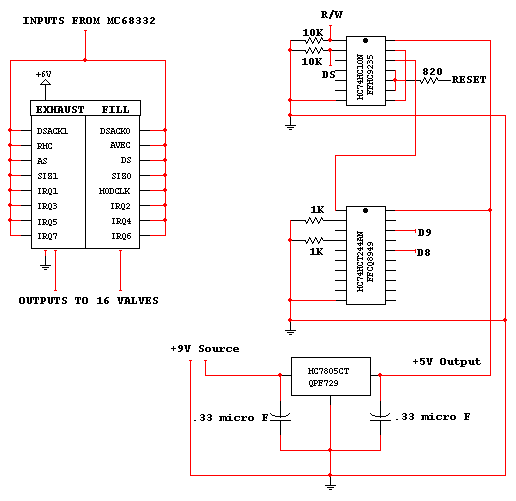
Figure 7-2: Data Pin Reset Circuit Along With Power Regulator
Since the MC68332 controller uses +5V a need for a portable source of this power is required. This problem is solved using the MC7805CT power regulator (see Figure 7-2) which uses a +9V battery and converts the voltage to +5V which is used by the controller, the evaluation board and the FETs, while the valves and LEDs obtain their power from a portable +6V source. Each FET controls a single valve and a schematic of this can be seen in the left portion of Figure 7-2. The signal received from the controller turns on an appropriate switch, which can be witnessed by the turning on off the corresponding LED, which then actuates the designed valve. Figure 7-3 below is a schematic of a single leg control using the controller output to the FETS. It shows the control of the four muscles, which make up one leg – the second leg has the exact same control scheme although the actual controller pins are different. The pins from ports E and F used to actuate the "fill" valves are:
PORT E: DSACKO PORT F: MODCLK
AVEC IRQ2
DS IRQ4
SIZ0 IRQ6
For the "exhaust" valves the pins are:
PORT E: DSACK1 PORT F: IRQ1
RMC IRQ3
AS IRQ5
SIZ1 IRQ7
(also see left side of Figure 7-2)
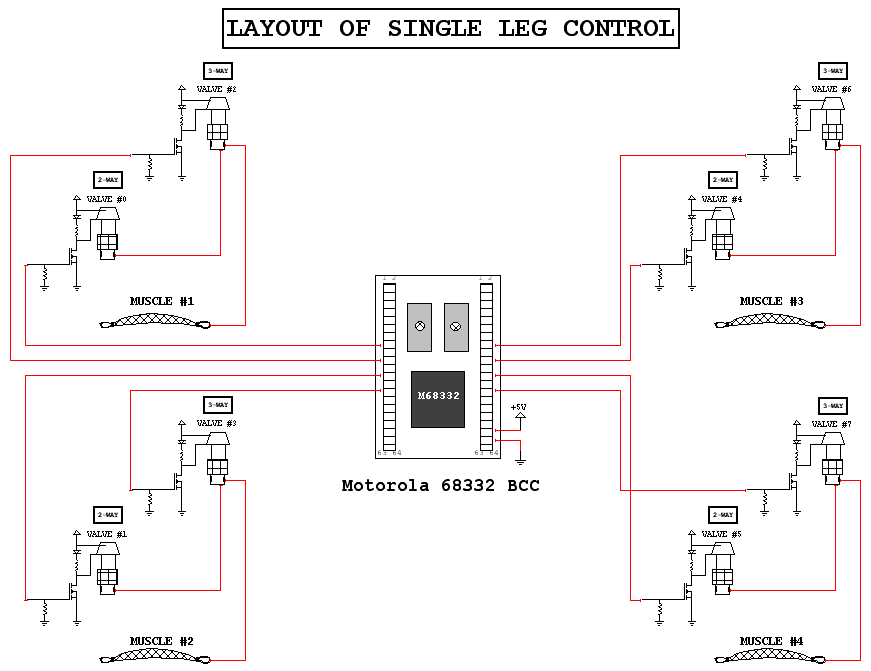
Figure 7-3: Single Leg Control Layout
8.0 Future Plans
During the next semester, new muscles will be purchased instead of built. This is due to the fact that the current muscles were only allowing about 20 fills before rupturing. This should allow the octopod to complete its first step and start walking.